4 Şubat 2016 Perşembe

OneDrive Business El Capitan Mac OS X Fix


Link ;
https://support.office.com/en-gb/article/Get-started-with-the-OneDrive-for-Business-Next-Generation-Sync-Client-on-Mac-OS-X-d11b9f29-00bb-4172-be39-997da46f913f?ui=en-US&rs=en-GB&ad=GB

Get started with the OneDrive for Business Next Generation Sync Client on Mac OS X


The OneDrive for Business Next Generation Sync Client lets you connect and sync files from your OneDrive for Business. You can add a work or school account to the new OneDrive for Business sync client and sync all your files to your computer.
This release of the OneDrive for Business Next Generation Sync Client has a number of valuable features for you and your organization. Before deploying, there are some known issues that you should review before determining whether this new client is currently appropriate for your organization. Read more here
NOTE   The OneDrive for Business Next Generation Sync Client is supported on OS X version 10.9 and above. The new OneDrive for Business sync client doesn't yet support syncing site libraries or on-premises instances of OneDrive for Business (when your organization doesn't subscribe to Office 365).

Setting up

If you have signed into the OneDrive client with a Microsoft account (for example, someone@outlook.com), you should already have the latest OneDrive sync client and you can skip to step 2 below.
NOTE   If you're not familiar or comfortable with using Terminal windows or other procedures mentioned in this article, we recommend that you wait until a later release to start using the new OneDrive for Business sync client.
  1. Start the Welcome to OneDrive wizard.

Method 1: If you have no accounts signed in to OneDrive

If you're not signed in to OneDrive with any account, you’ll want to set up OneDrive so that you can connect a work or school account.
  1. From a Terminal window, type the following and tap Return:
    defaults write com.microsoft.OneDrive-mac DefaultToBusinessFRE -bool True
    Screenshot of entering the DefaultToBusinessFRE in a Terminal window
  2. From a Terminal window, type the following and tap Return:
    defaults write com.microsoft.OneDrive-mac EnableAddAccounts -bool True 
    Screenshot of entering enableAddAccounts command in Terminal windows
  3. Start OneDrive by hitting cmd+Space to launch a Spotlight query and type “OneDrive”. 
This starts the Welcome to OneDrive wizard where you can click Sign in to set up your work or school account. See  Welcome to OneDrive wizard.
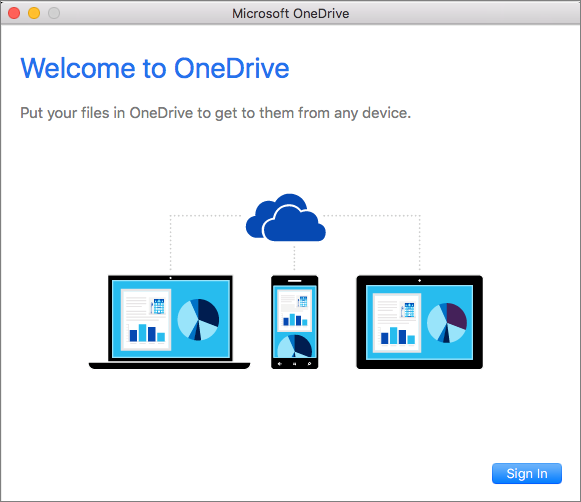
Screenshot of the Welcome page of the Welcome to OneDrive wizard for a Mac Business account

Method 2: If you already have a personal account signed in to OneDrive

If you already have a personal account signed in to OneDrive, you’ll want to configure OneDrive to add a work or school account directly from Preferences.  
  1. Click the OneDrive cloud icon up in your Menu bar and select Quit OneDrive.
  2. From a Terminal window, type the following and tap Return: 
    defaults write com.microsoft.OneDrive-mac EnableAddAccounts -bool True 
    Screenshot of entering enableAddAccounts command in Terminal windows
  3. Click the OneDrive cloud icon up in your Menu bar and select Preferences . 
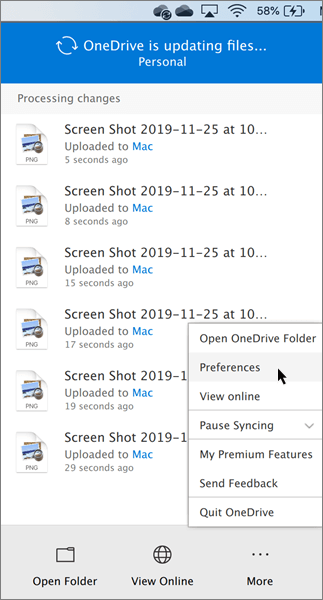
    Screenshot of setting OneDrive personal preferences
  4. Click the Account tab and in the new Add Account group, select Add a Business Account to start the Welcome to OneDrive wizard. 
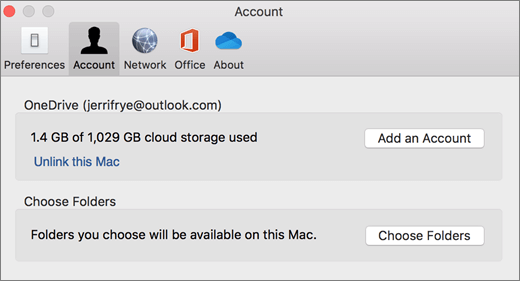
    Screenshot of adding business account in OneDrive preferences on a Mac
  5. Sign in with your work or school account.
    Screenshot of the Welcome page of the Welcome to OneDrive wizard for a Mac Business account

Welcome to OneDrive wizard

The Welcome to OneDrive wizard walks you through the steps to sign in and set up OneDrive to sync your work or school files.
  1. On the Welcome to OneDrive screen, click Sign In.
    Screenshot of the Welcome page of the Welcome to OneDrive wizard for a Mac Business account
  2. Sign in to Office 365 with your work or school account.
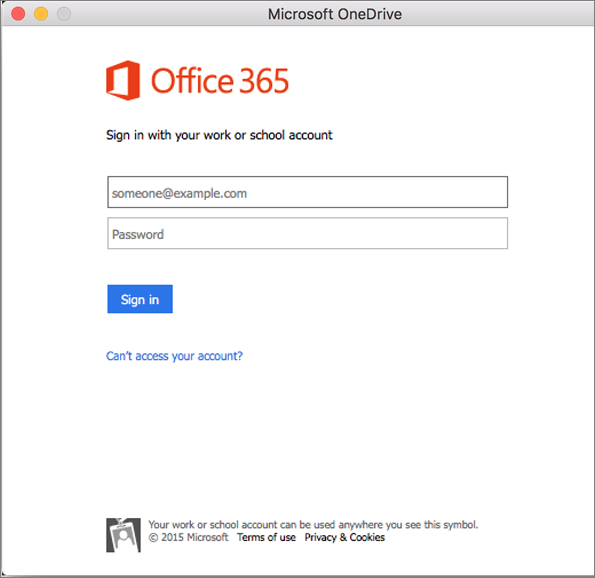
    Screenshot of sign-in screen in Welcome to OneDrive wizard on a Mac
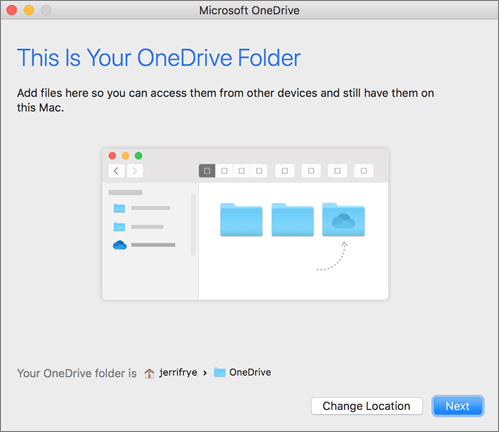
  3. On the This is your OneDrive folder screen, click Choose OneDrive Folder Location
    Screenshot of the This is Your OneDrive Folder page in Welcome to OneDrive wizard on a Mac
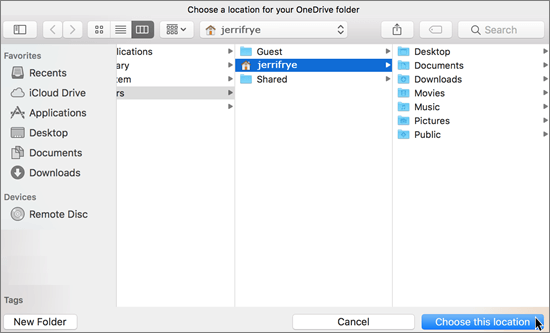
  4. Select a location where you would like to save your OneDrive files and click Choose this location
    Screenshot of choosing a folder location in the Welcome to OneDrive wizard on a Mac
  5. When you see the This is your OneDrive folder screen, you’ll now see a path to the folder you selected. Click Next to continue. 
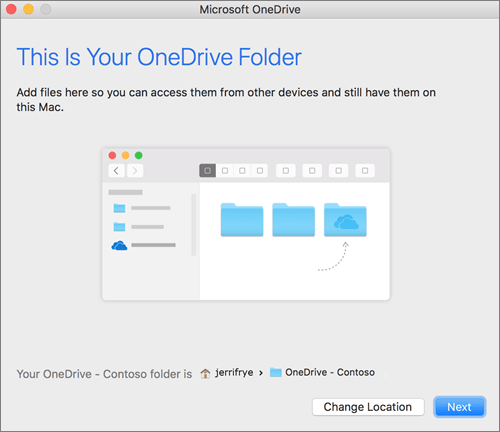
    Screenshot of This is your OneDrive folder screen after choosing a folder in the Welcome to OneDrive wizard on a Mac
  6. On the Sync Files from Your OneDrive screen, choose the folders you want to sync, and click Next
  7. When you see Your OneDrive Is Ready for You, the last thing to do is make sure you select Open at login so my files sync automatically. This will ensure that OneDrive runs at login and you always have the most up to date version of all your files. 
    After you enable OneDrive to open at login, you’re done! Click Open your OneDrive folder to see your files sync to your folder. 
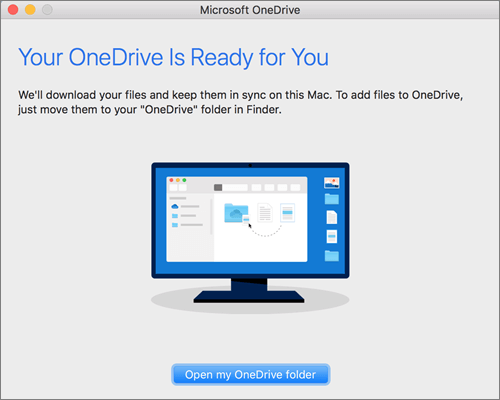
    Screenshot of the last screen of the Welcome to OneDrive wizard on a Mac
You’re all set. You’ll find a folder in Finder called OneDrive – YourTenantName.
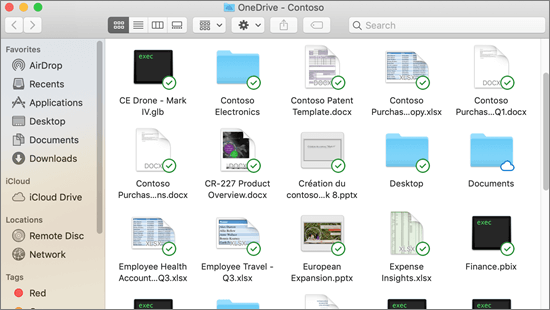
Screenshot of Finder integration on Mac with sync overlays for synced files
You can find OneDrive up in your Menu bar. You’ll have one cloud for every account you’ve connected to OneDrive. So you’ll have one cloud if you’re only syncing a work or school account, one cloud if you’re syncing only a personal account, or two clouds if you’re syncing both. 
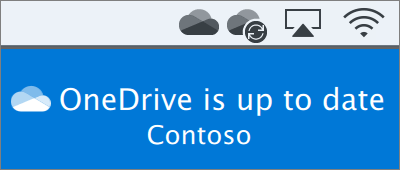
Screenshot of OneDrive in the menu bar on a Mac after finishing Welcome to Onedrive

Turn on Finder integration

If you’re on OSX 10.10 or higher, get sync status directly from Finder by enabling Finder overlays in Settings. 
First, click the Apple logo in the top left corner of your Mac Desktop and select System Preferences, then select Extensions in the top-level menu (shown in the 3rd row from the top).
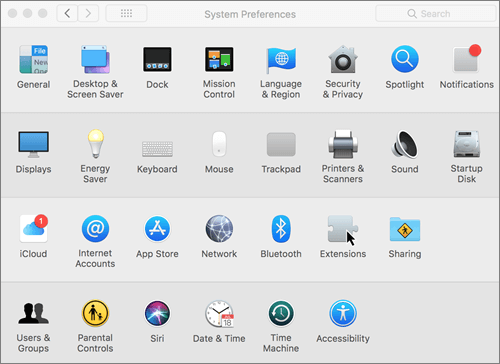
Screenshot of system preferences on a Mac
Toggle on the OneDrive Finder Integration to enable Finder overlays.
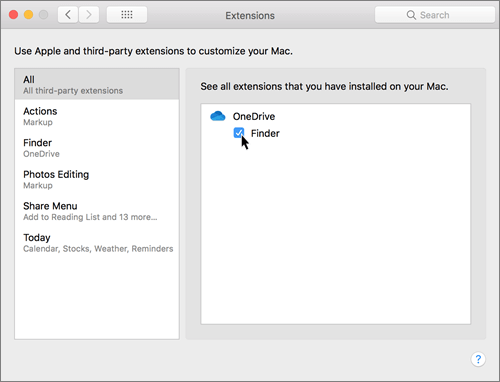
Screenshot of Extensions in system preferences on a Mac
You’re all set. Open up your OneDrive folder in Finder to see overlays on your files and folders. 
Screenshot of Finder integration on Mac with sync overlays for synced files


Additional resources

For additional resources about the Next Generation Sync Client:
Title
Description
Get an overview of what the Next Generation Sync Client is all about.
Learn how administrators can deploy the Next Generation Sync Client on OS X to users in their enterprise environment.
Knowledge base article with release notes, limits, and restrictions (such as invalid characters in file names).


3 Şubat 2016 Çarşamba

Paylaşılan posta Outlook'ta Gönderilmiş Öğeler klasörüne bir paylaşılan posta kutusundan gönderilen iletiler kaydedilmez.

Paylaşılan posta Outlook'ta Gönderilmiş Öğeler klasörüne bir paylaşılan posta kutusundan gönderilen iletiler kaydedilmez.

Çözüm Microsoft tarafında aşağıdaki gibidir ;

SORUN
Microsoft Outlook 2010'i veya sonraki bir sürümünü kullanıyorsanız ve bir paylaşılan posta kutusundan başka bir kullanıcı adına veya başka bir kullanıcı olarak e-posta iletileri gönderme izni atanmış varsayılmaktadır. Ancak, kullanıcı adına veya başka bir kullanıcı bir ileti gönderdiğinizde, gönderilen iletiyi paylaşılan posta Gönderilmiş Öğeler klasörüne kaydedilmez. Bunun yerine, posta kutunuzun Gönderilmiş Öğeler klasörüne kaydedilir.
NEDEN
Office 365'te paylaşılan posta kutuları bir lisans gerektirmeyen ve bağımsız bir posta kutusu olarak Outlook'a eklenemiyor. Paylaşılan bir posta kutusuna oturum açamazsınız. Bunun yerine, kendi posta kutusu için oturum açın ve paylaşılan posta açmak sonra. Göndermek veya paylaşılan bir posta kutusundan yeni bir iletiyi yanıtladığınızda, Outlook otomatik olarak gönderen veya gönderenin hesabından yanıtlar. Bu nedenle, ileti gönderenin posta kutusu Gönderilmiş Öğeler klasöründe depolanır.
ÇÖZÜM
Önemli Bu bölümdeki adımları dikkatlice izleyin. Kayıt defterini hatalı bir şeklide değiştirirseniz önemli sorunlar oluşabilir. Sorun durumunda, değişiklik yapmadan önce geri yüklemek üzere kayıt defterini yedekleyin.

Bu soruna geçici bir çözüm için aşağıdaki yöntemlerden birini kullanın.

Yöntem 1: Outlook istemcisinde DelegateSentItemsStyle kayıt defteri değerini ayarlayın

Not: Outlook düzgün çalışması için bu seçeneği için önbelleğe alınmış modunda çalışacak şekilde yapılandırılmış olması gerekir. Daha fazla bilgi için aşağıdaki Microsoft Bilgi Bankası makalesine bakın:

2703723 DelegateSentItemsStyle kayıt defteri değerini kullandığınızda e-posta Kutusu'nda kalır

Outlook 2010 çalıştırıyorsanız, 14 Aralık 2010 tarihli Outlook 2010 düzeltme paketini yükleyin. Daha sonra aşağıdaki adımları izleyin. 

Bu düzeltme paketi hakkında daha fazla bilgi için aşağıdaki Microsoft Bilgi Bankası makalesine bakın:

Outlook 2010 düzeltme paketi (outlook-x-none.msp) 2459115 Açıklama: 14 Aralık 2010

Not: Outlook 2013 veya sonraki bir sürümünü çalıştırıyorsanız, herhangi bir düzeltme yüklemek zorunda değilsiniz.

  1. Başlat' ı tıklatın, Çalıştır' ı tıklatın, regedityazın ve Tamam' ı tıklatın.
  2. Bulun ve aşağıdaki kayıt defteri alt anahtarını bulup tıklatın:

    HKEY_CURRENT_USER\Software\Microsoft\Office\x.0\Outlook\Preferences
    Not: Office sürümünüzü x.0 yertutucusu (16,0 Office 2016, 15,0 = Office 2013, 14.0 = Office 2010 =).
  3. Düzenle menüsünden Yeni'nin üzerine gelin ve sonra da DWORD Değeri'ni tıklatın.
  4. DelegateSentItemsStyleyazın ve Enter tuşuna basın.
  5. DelegateSentItemsStylesağ tıklatın ve sonra Değiştir' i tıklatın.
  6. Değer verisi kutusuna  1 yazın ve Tamam'ı tıklatın.
  7. Kayıt Defteri Düzenleyicisinen Çıkış yapın.

Yöntem 2: posta kutusu iletinin bir kopyasını paylaşılan posta Gönderilmiş Öğeler klasörüne Exchange çevrimiçi veya şirket içi Exchange Server kaydetmek için yapılandırmak


Exchange Online Office 365 veya Exchange Server 2013 toplu güncelleştirme 9 veya sonraki güncelleştirme

Exchange Server 2013 için Toplu Güncelleştirme 9, Yöneticiler için bir ileti kopyalanır Gönderilmiş Öğeler klasörünü yapılandırma sağlayan yeni bir özellik kullanıma sunmuştur. Daha fazla bilgi için bkz: daha çok denetim Gönderilmiş öğeler paylaşılan posta kutuları kullanarak istediğiniz Exchange Blog -?.

Exchange Server 2010 Service Pack 2 güncelleştirme paketi 4 veya daha sonraki güncelleştirme

Gönderilmiş Öğeler klasörü, ileti kopyalanır yapılandırmak için yeni bir Exchange PowerShell cmdlet'i Exchange Server 2010 Service Pack 2 için güncelleştirme toplaması 4 başlamıştır. Bu yeni özellik, Exchange Server çalıştıran sunucu tarafından işlendiğinden, Outlook'u Çevrimiçi modda yapılandırılabilir veya Önbelleğe Alınmış Exchange Modu'nu. Ancak, yalnızca Outlook DelegateSentItemsStyle kayıt defteri değeri devre dışı bırakılırsa bu özelliği çalışır.

Set-MailboxSentItemsConfiguration cmdlet'i hakkında daha fazla bilgi için aşağıdaki Microsoft Bilgi Bankası makalesine bakın:

2632409 "Farklı Gönder" ve "adına gönder" izni kullanılarak gönderilen iletileri yalnızca bir Exchange Server 2010 ortamında gönderen Gönderilmiş Öğeler klasörüne kopyalanır

21 Ocak 2016 Perşembe

Itunes version 12 to iphone ring

alıntı: 

Islemlerin listesi: 

Oncelikle zil sesi yapmak istegimiz mp3 u 20 sn den uzun olmayacak sekilde kirpalim. Audacity ile bu islemi kolayca yapabilirsiniz. ben yillardir bu yazilimi kullaniyorum ama siz bu islemi yapabileceginiz farkli bir yazilim da kullanabilirsiniz. (Hani tam uzunlukta atabilecektik dediginizi duyar gibiyim. acele etmeden yazinin devamini okuyun.) 

0. iTunes da Edit->Preferences-> Advanced tabına geçin ve Copy files to iTunes Music Folder when adding to library secenegi isaretli degil ise isaretleyin ve itunes u tekrar baslatin. 
1. Zil sesi yapmak istediginiz ve max 20 snlik mp3 u itunes library ye atin. 
2. Library de ilgili mp3 un uzerine tiklayip Create AAC Version u secin. 
3. Library de ayni parcadan AAC versiyon ikinci bir parca goruntulenecek. Bunu itunes dan mouse unuz ile tutarak ornegin desktop/masa üstünüze sürükleyin. Bu sekilde desktop ınızda M4U uzantili bir dosya olusacak. 
4. itunes da bulunan ve desktop a kopyaladiginiz AAC turundeki dosyayi libraryden silin. (bu islem mutlaka yapilmali yoksa ringtone synchronize olamaz.) 
5. desktop taki m4u uzantili dosyanin uzantisini m4r yapin. 
6. dosya uzerine cift tiklayin. Bu islem ile 20 sn den buyuk olmayan mp3 dosyaniz itunes da Ringtones altina gelecektir. 
7. Devices da iphone ununuz uzerine tiklayip Ringtones sekmesine gelin ve Sync Ringtones isaretli iken Sync tusuna basin. 
8. Su anda 20 sn lik mp3 unuz iphone nuzda zil sesi olarak mevcut.

14 Eylül 2015 Pazartesi

Office365 kullanıcılara Owa üzerindeki izinleri atama Örn: İmza değiştirsin?

Exchange online üzerinde kullanıcıların kendi isteklerine uygun şirket kurallarını alt üst eden saçma sapan imzaları eklemelerine izin vermemek için aşağıdaki adımlar izlenir.

Admin panelinden Exchange admin center Permission (İzinler)

Outlook Web App Polices (Outlook Web App İlkeleri)

OwaMailboxPolicy-Default edit seçeneği ile, Features (Özellikler)
More Options.. Diğer Seçenekler

Tabı altında kullanıcılara ait, seçeneklere izin verip izin engelleye bilirsiniz.

İletişim yönetimi
Anlık ileti etkinleştirilirse, kullanıcılar anlık iletiler gönderme ve alma, diğerleri için güncel kişi bilgisi görme ve kendi kişi bilgilerini değiştirme gibi anlık ileti işlevlerine erişim elde eder. Daha fazla bilgi
SMS Mesajlaşması etkin olarak ayarlandığında, kullanıcılar SMS mesajları gönderip alabilir ve web üzerinde Outlook'u kullanarak SMS mesajı bildirim kuralları oluşturabilir.
Birleşik Mesajlaşma Etkin olarak ayarlanırsa, kullanıcılar sesli mesaj ve fakslarına web üzerinde Outlook ile erişebilir. Sesli mesaj seçeneklerini de yapılandırabilirler. Kullanıcılar, Enable-UMMailbox cmdlet'i kullanılarak Birleşik Mesajlaşma için etkinleştirilebilir. Daha fazla bilgi
Exchange ActiveSync Etkin olarak ayarlanırsa, kullanıcılar web üzerinde Outlook'ta Seçenekler'i kullanarak bağlı mobil cihazlarını yönetebilir.
Kişiler Etkin olarak ayarlanırsa, kullanıcılar web üzerinde Outlook'ta Kişiler'i kullanabilir.
Mobil cihaz kişisi eşitleme seçeneği Etkin olarak ayarlandıysa, kullanıcılar kişi kayıtlarına web üzerinde Outlook dışından da erişebilir. Daha fazla bilgi
LinkedIn kişi eşitleme etkinse, kullanıcılar LinkedIn bağlantılarını posta kutularına kişiler olarak ekleyebilir. Kullanıcının arkadaşı LinkedIn'de bilgilerini güncelleştirdiğinde, kişi otomatik olarak güncelleştirilecektir. Daha fazla bilgi 

8 Temmuz 2015 Çarşamba

Exchange Online içerisinde kullanıcı mail box larında toplu mail aramak

Sanırım bu ızdırabı aşşağıdaki yöntemle çözebildim. belki daha kolay yolu vardır :)

Exchange yönetim merkezi
    Uyumluluk merkezi
       Yerinde ebulma ve saklama sekmesinde + ile yeni bir kural oluşturup ilgili alanları doldurarak istenilen mail box içerisinde veya istenilen mail boxlar içerisinde bir maili aramak mümkün.
Bu aramanın birazdaha geliştirilmesi gerek şimdilik istenileni buluyor ancak detaylar tam değil.
ama işe yarar :)

Exchange Online Auto Disclaimer Signature Fix

Exchange online otomatik imza eklemek sanırım şuan için tam bir sorun .

bir çok site üzerinde bir çok ana fikri aynı anlatım zaten mevcut.
Ancak temel sorun imza olarak eklenen disclaimer sonrası yanıt verilen forward edilen maillerde kabusa dönüyor. aşşağıdaki sitede verilen örneklemeyi şimdilik test etme şansım oldu başarılı gibi, daha detaylı test etmek ve gözlemlemek gerekiyor sanırım.


http://www.office365tipoftheday.com/2013/11/07/exchange-online-how-to-add-signatures-and-disclaimers/


ALINTIDIR.

For years there have been numerous products on the market for Exchange Server that automatically add signatures to outbound emails.
These products traditionally need to run on the Exchange Server and retrieve information from Active Directory. There is also usually a PC-based console on which to create the signatures and administer the system.
These solutions also exist for Exchange Online in Office 365, however this is also possible without any on-premise systems using native Exchange Online functionality. All it takes is a little bit of reading to understand the variables involved.
Jesper Osgaard wrote a similar piece on his TechNet blog, however in this post I have gone a couple of steps further.
Before starting it is important to have your user information up to date in the Office 365 administration portal. It is assumed that first name & last name are fine, however if you want to automate things such as phone numbers, address details – these need to be present in the user properties.
The first step is to log into the Microsoft Online Portal (https://portal.microsoftonline.com) and select the option to Manage Exchange Online settings via Admin > Exchange.
You’ll then need to select the Mail Flow menu option which will open up in the Rules sub-section.
Rules
At this point we begin defining our rule. Select the options as per the screenshot below.
Specify the variables you want to use from the following list:
  • DisplayName
  • FirstName
  • Initials
  • LastName
  • Office
  • PhoneNumber
  • OtherPhoneNumber
  • Email
  • Street
  • POBox
  • City
  • State
  • ZipCode
  • Country
  • UserLogonName
  • HomePhoneNumber
  • OtherHomePhoneNumber
  • PagerNumber
  • MobileNumber
  • FaxNumber
  • OtherFaxNumber
  • Notes
  • Title
  • Department
  • Company
  • Manager
  • CustomAttribute1 to CutomAttribute15
This will show up as blank text, however if you have any HTML or CSS skills you can use these to improve the aesthetics. Also linking to graphics such as company logos is supported – however you may find that the recipients company may block calling external files within an email.
Select OK, and the rule is applied immediately.
Here is what the end result looks like:
The problem is if you don’t set an exception – your email signature / disclaimer will be added to each additional reply:
So going back to the Exchange Online rule, open up the signature rule you created and select More Options:
We’re now able to add an exception which allows the rule to be ignored if the email is a reply.
Under the exception menu select The subject includes… and add “RE:” to the field.
Press OK, save the rule, and now we’ll see that the rule isn’t applied on a reply:
Obviously the signature I’ve created in this example is quite plain, so it would be a good idea to get a web designer involved who can write the relevant HTML & CSS to make the signature appear more to your liking.
You now have fully functional automatic signatures! No need to configure Outlook for every new user, and a great way to keep a standard signature across all users.